How to Upgrade Your Laptop’s Hard Drive to an SSD
There’s no better way to speed up and upgrade a laptop than to replace its mechanical drive with an SSD (Solid State Drive). Sure, you can defragment your hard drive in Windows 10, but it won’t improve your performance as an SSD would.

It’s a no-brainer, but if the thought of reinstalling Windows 10 and all of your programs and then tweaking all of their settings gives you the chills, don’t worry. In an hour or two, you can easily be up and running with a clone of your current system – except now your laptop will have blazing performance.
Before You Begin: Check Upgradability

Find the right SSD form factor and interface. The other thing you’ll want to check before you go out and buy a replacement SSD is your drive’s form factor; you need to make sure the drive will fit in the laptop. Most laptops have 2.5-inch drives, but ultraportable notebooks may use the 1.8-inch disk size. Also, even 2.5-inch drives can have different thicknesses– 7 mm or 9.5 mm–and different interfaces (SATA or IDE, usually in laptops from 2008 or before). Laptops most widely use 2.5-inch SATA drives, but you should check your laptop manual or specifications to make sure you buy the right size SSD with the proper interface. Alternatively, you may be able to find this information by visiting Crucial’s Advisor Tool or looking at your current drive’s label: Open the access panel and look on the drive itself to see if it says 2.5-inch and SATA and what thickness you need. Generally, 7mm, 2.5-inch SATA SSDs will fit even in the 9.5mm slots and some come with spacers for a tighter fit.
What You’ll Need

An external enclosure or adapter to connect that SSD to your laptop. For this how-to, we used a StarTech SATA external hard drive enclosure, although there’s an updated USB 3.0 version you might prefer ($24 on Amazon). Either way, the enclosure comes in handy not just for connecting the SSD for the cloning process, but also afterward to turn your current drive, once it’s replaced by the SSD, into an external one for backups and other storage.
Small Phillips screwdriver.
Separate external hard drive (optional). You might need this if you have large folders, such as photos and videos, that might not fit on your SSD, and also to create a full system backup at the start.
Prepare Your Current Drive for Cloning
First, we need to do a little prep work on your current drive.
1. Make a full backup of your system. Create a system image backup in Windows 10 by going to the Control Panel (hit the Win+X keyboard shortcut and select Control Panel), then go to “Save backup copies of your files with File History” (under System and Security). In the left menu, go to “System Image Backup” to create a system image on an external drive or network location.

3. Clean up your drive for additional space. This is also the time to uninstall programs you aren’t using anymore and delete unnecessary files that you don’t want to be carried over to your SSD. Make one last uncluttering sweep with freeware CCleaner, which deletes old temp files and other space hogs, or at the very least run Windows’ disk cleanup (in Windows search – look for “disk cleanup,” then choose “Free up disk space on this PC”).
Connect the SSD
Now we’ll get the SSD set up for the cloning process.
1. Physically connect the SSD. Place the SSD in the enclosure or connect it to the USB-to-SATA adapter, and then connect it to your laptop with the USB cable.


3. Resize the current drive partition to be the same size or smaller than the SSD. While you’re in Disk Management, check to see if your current disk’s primary partition (usually, C:, the one that has Windows and your installed programs) is larger than the SSD. If not, you’ll need to shrink the partition so that it and the other system recovery partitions are smaller than the SSD. Right-click on the OS partition and choose “Shrink…”

At this time, you should restart your computer to make sure that the partition works before cloning.
View our range of SSD available at Matrix Warehouse online or instore. View the range of Hard Drives available.
Clone Your Hard Drive
Finally, it’s time to clone your drive to the SSD.
1. Install disk cloning software. For this tutorial, we’re using EaseUS Todo Backup Free, which is free for personal use, has a user-friendly interface, and also optimizes the migration to an SSD.
2. Select the source and destination drives in the cloning software. In EaseUS Todo Backup, select the “Clone” option from the main menu. Follow the wizard to select your source disk (your HDD) and your destination (the SSD).
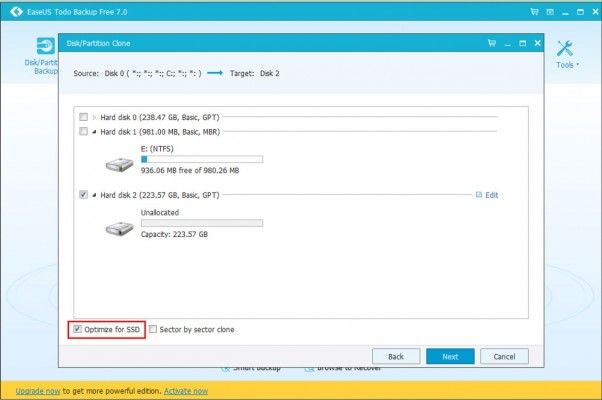
3. Review the layout and start cloning. In the next screen, you’ll be able to compare the source drive with your SSD. As you see below, EaseUS automatically adjusts for different-sized drives by using the unallocated space on your current drive (which we created in step 3 of the last section).

Click “Proceed” then choose “Shut down computer when the operation completed.” This took us about 45 minutes to complete, but your mileage may vary.
Physically Swap Your Current Drive with the SSD
Now let’s remove the old drive and install the SSD.
1. Turn the computer off and remove the back panel. Turn your laptop off and then disconnect both the power cable and any other connected cables — including the SSD. Then unscrew the back panel and remove it to get access to your hard drive.
2. Look for any screws securing your drive to the laptop. You’ll need to unscrew those before you can remove the drive.

3. Lift the old drive up about 30 or 45 degrees and pull it out.
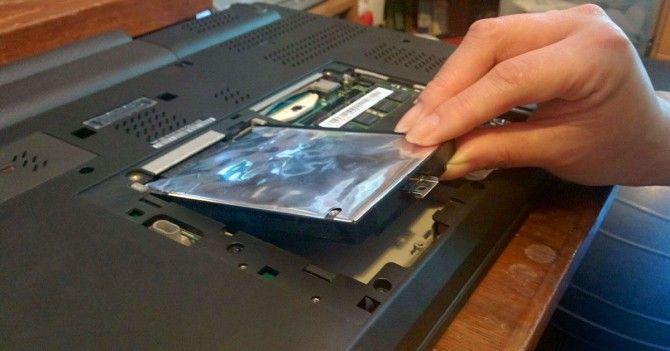
4. In its place, install the SSD and put the back panel on. Install the SSD by doing the reverse of how you removed the HDD: Slide the drive-in at an angle and push it firmly into place so it’s fully connected to the interface. Then secure it with the screw you removed in the last step and, finally, screw the back panel covering the drive back on.
Boot Up with the SSD
The moment of truth: Turn your laptop on. If your laptop boots as normal and you see all of your programs and settings just the way they were before (except much faster), all went well.
For one final test to see everything went as planned, let’s make sure Windows recognizes your drive as an SSD. Hit Win+S to search for “defrag” and select “Defragment and optimize your drives.” In the Optimize Drives window, your drive should be listed as a Solid State Drive. Mission complete!

You can now put your old drive in the enclosure and wipe it in Disk Management, perhaps moving your media files to this drive. Just make sure your automated backup system (you have one, right?) covers both your new internal drive and connected external ones.
Another way you can tell the migration worked? You’re now booting up, launching programs, and multitasking so much faster than before.
Speed Tests: No Contest
To see just how much switching from an HDD to an SSD would affect performance, we timed how long a Dell Inspiron 15 5000 with 8GB of RAM took to open a Word document with one page of text, a blank Excel spreadsheet, and a new instance of Google Chrome. (We ran each test multiple times and took the average.)

The 1TB, 5,400 rpm Seagate HDD that came with the Inspiron took 31.9 seconds to open the Word document, 19.9 seconds to open the Excel spreadsheet, and 14 seconds to open Chrome.
Credit to Laptop Mag for writing such an informative piece.
View our range of SSD available at Matrix Warehouse online or instore. View the range of Hard Drives available.